When we use a Public WiFi it also lands us first on a Captive portal. But, sometimes it happens that we get connected to a WiFi but the login page won’t show up. In that case, we cannot use the internet even after connecting to the WiFi. If you are facing the same problem then you should give a look at this informative article, where you will get to know how to open the public WiFi log in page if it won’t show up on Windows and Mac.
Fix Public WiFi Login Page Not Showing On Windows 10
If you are using a Windows device and facing similar problems. Then you can follow the methods shown below to solve this problem.
1 Fix Public WiFi Login Page Not Showing On Windows 101.1 Method 1: Try To Open Router’s Default Page1.2 Method 2: Turn Off Third-Party DNS Servers1.3 Method 3: Use Incognito Mode1.4 Method 4: Use Any Other Browser As Your Default Browser1.5 Method 5: Clear DNS Cache Using CMD1.6 Method 6: Renew DHCP Lease Using CMD1.7 Method 7: Turn Off Windows Firewall1.8 Method 8: Restart Your Computer2 Get WiFi Login Page On Mac2.1 Conclusion
We have used the steps and screenshots from Windows 10 but these methods will also work for Windows 7 and 8.
Method 1: Try To Open Router’s Default Page
This is a pretty simple method that you can use to manually access the router’s login page. First, connect to the public WiFi then go to the browser and in the address bar type 127.0.0.1 or 192.168.1.1. You can also type Google.ca or Google.it and then press enter to get on to the router’s login page. If you are using a Mac then you can type captive.Apple.com instead of Google.ca or Google.it. Most of the time your problem will be solved just by doing only this. If however, these methods don’t work you can try finding the IP address of the connected router. After that, paste it in your browser and press enter to land on the login page of the router. The steps to find the IP address of the router are as follows:
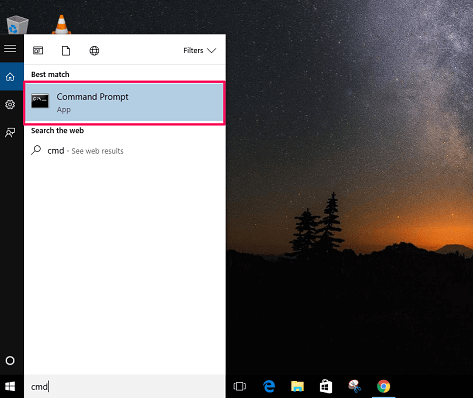
- Go to the Search box, Type CMD and open it.
- Once open, type ipconfig command then press enter.
- Now find the IPv4 address under the Wireless LAN adapter Wi-Fi. Note: The IPv4 Address is the IP address of the router. Now you can paste this IP address in your browser and press enter to start using the Internet.
Method 2: Turn Off Third-Party DNS Servers
DNS (Domain Name System) translates domain names into IP addresses. DNS is like a phonebook of the internet. Sometimes it happens that we use third-party DNS servers like Google Public DNS server, OpenNIC, Dyn, etc. which may prevent a public WiFi to connect properly. To solve this issue you have to manually turn off the third-party DNS servers. The steps to which are as follows:
- Right click on the network icon and go to Open Network and Sharing Center.
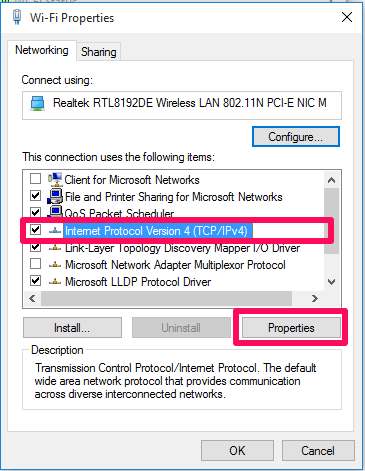
- Now right click on the WiFi and select Properties.
- A new tab will open, find Internet Protocol Version 4(TCP/IPv4). Click on it, and select Properties.
- Now enable the options, Obtain an IP address automatically and Obtain DNS server address automatically and hit Ok. Note: This method will work only if you have any third-party DNS server on your computer.
Method 3: Use Incognito Mode
It doesn’t matter what browser you use, every browser has an incognito mode be it Chrome, Safari, Opera, or Firefox. The biggest advantage of using the incognito mode is that it lets you browse the internet privately i.e it does not store the caches while browsing. You can try visiting a non-HTTPS site like stealmylogin.com in the incognito mode of your browser while connected to the WiFi. If you are using a Mac then you can visit a non-HTTPS site like captive.Apple.com. Occasionally it happens that the browser cache tries to use the DNS info to load a site instead of loading the login page. I personally tried this method and it worked like a charm for me.
Method 4: Use Any Other Browser As Your Default Browser
When we connect to a public WiFi its login page by default opens in our default browser. What you can do is that you can change your default browser and try to connect to the WiFi again. Most probably the login page will open in your new default browser. I tried to connect to a free public WiFi at my office but the login page didn’t appear. At that time I had Chrome as my default browser then I changed it to internet explorer. After that, I tried to connect to the same WiFi again and this time the login page showed up and I was able to use the internet. The steps to change your default browser are shown below:
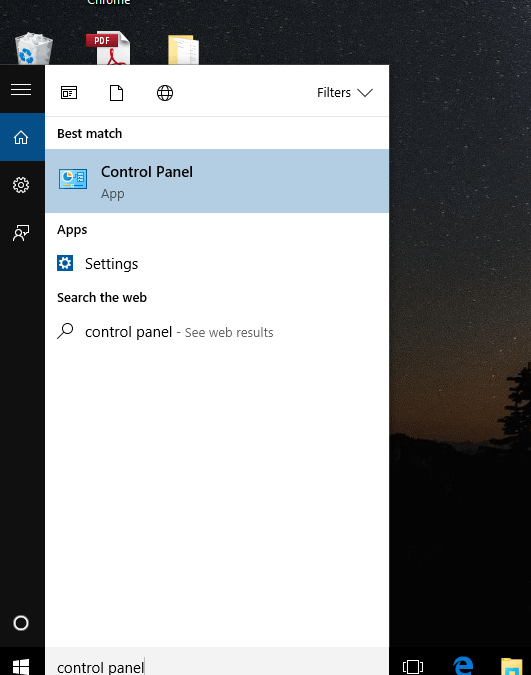
- Go to the Search box and type Control Panel.
- Select Default Programs>Set your Default programs.
- Now select the browser you want to make default. Then click on Set this program as default and press OK. Now, your new default browser is ready to be used. Connect to the WiFi and start using the internet on your computer.
Method 5: Clear DNS Cache Using CMD
If the above methods didn’t work for you then you can try flushing DNS cache on your computer. Sometimes DNS caches are the main culprit which won’t allow you to get connected to a public WiFi. The methods to flush or clear DNS Cache Using CMD are shown below.
- Go to the Search box type CMD and open it.
- Once open type the command ipconfig/flushdns and press Enter. This will flush the DNS cache on your computer. Now, you can try connecting to WiFi again.
Method 6: Renew DHCP Lease Using CMD
DHCP or Dynamic Host Configuration Protocol is a network server that automatically assigns IP addresses to a client device or the router in this case. By renewing the DHCP server it will automatically assign a new IP address to the router which you are connected to. This can increase your chances to get connected to the public WiFi. The steps to renew the DHCP lease using the command prompt are as follows:
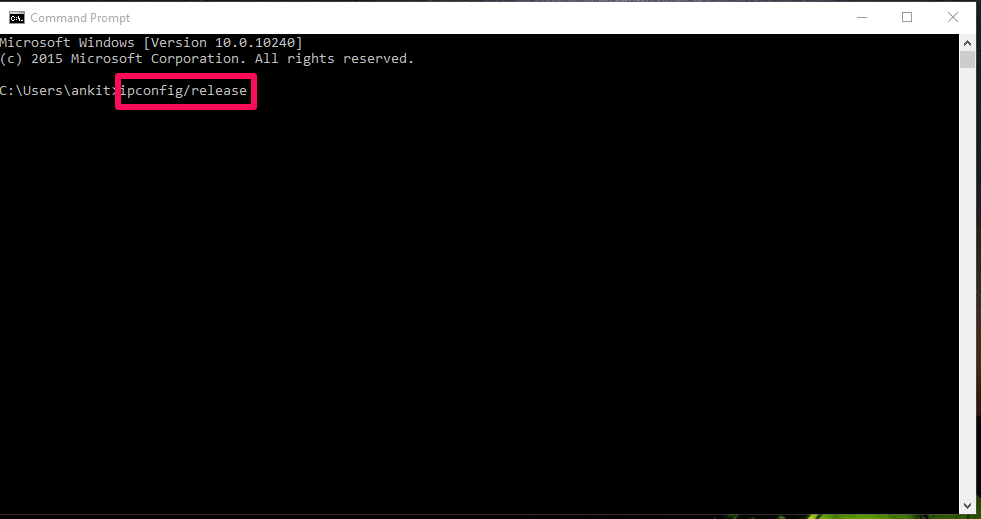
- Open CMD.
- Now, before renewing the DHCP lease you have to release the current IP configurations. And to do that type command ipconfig/release and press Enter.
- Now renew the IP configurations by typing command ipconfig/renew and press Enter. Once the DHCP server renews you can try connecting to the public wifi again.
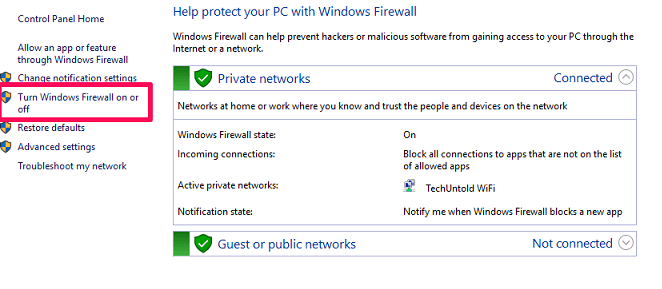
Method 7: Turn Off Windows Firewall
Windows Firewall is basically a Windows default program. It filters information coming from the internet to your computer so that it can block potentially harmful programs. You can turn off the firewall to try your luck to get to the login page of the public WiFi. The steps to turn off the firewall are given below:
- Go to the Search box and type Firewall. Now, click on Windows Firewall.2. After that, a new window will appear. Now, click on Turn Windows Firewall on or off on left side.3. Next, click on Turn off Windows Firewall. You can try to connect to the WiFi now. If it works you can turn on the Firewall once you are done with the WiFi.
Method 8: Restart Your Computer
It’s hardly unlikely that none of the above-mentioned methods work. But, if somehow they don’t you can try restarting your computer to solve this problem. Turn off the WiFi and then turn it back on. Now restart your computer try connecting to the WiFi again. If this didn’t work try manually clearing the cache on your browser. If none of the above methods work for you then there is a possibility that the WiFi is down. And the router needs to be restarted in this case.
Get WiFi Login Page On Mac
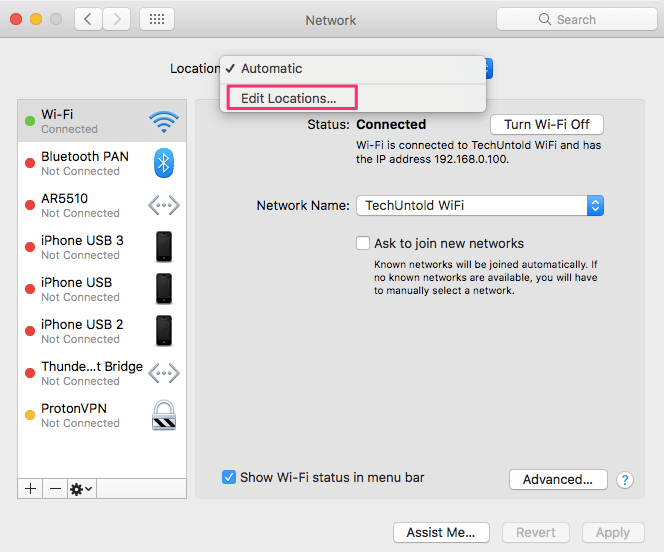
Methods 1,2,3, and 4 mentioned above in the Windows 10 section will work in Mac as well. But there is one method which you can only use in a Mac device to get the network login page. The method is creating a new network location which is an easy way to clear your network settings. The Network locations stores your network settings for different locations. The steps to create a new network location are as follows:
- Open System Preference and select Network.
- Now click on the Location drop-down menu at the top and select Edit Locations…
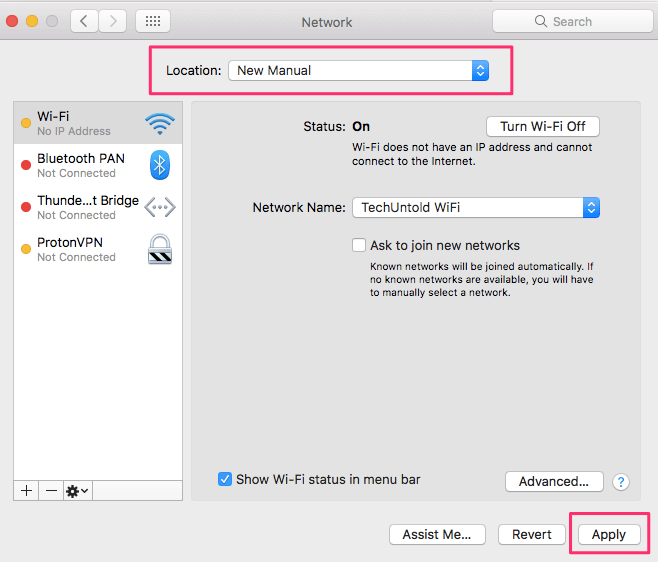
- After that click on the + icon to add a new location. Give it a desired name and click on Done.
- Select the newly created location and click on Apply to save the changes. Now, try to connect to the WiFi of your choice. By using this method you can easily access the login page of a public WiFi on your Mac device. Also Read: How To Set WiFi Network Priority On Windows And Mac
Conclusion
If you are among those who frequently use public WiFi then this article will surely help you to stay connected to the internet. If you can’t connect to public WiFi on your Android and iPhone then you can force the WiFi login page to show up. To do that you can manually open the routers login page as shown in the article. Also, we recommend you to go for a good VPN service provider if you are a frequent public WiFi user. The public WiFi is not that secure in terms of privacy, using a good VPN service will take care of your privacy concerns. Save my name, email, and website in this browser for the next time I comment. Notify me of follow-up comments via e-mail.
Δ